
Photography for ID Purposes
When you can't bring in actual mushrooms for our taxonomists to ID, shown below are some tips on photographs and observations to send us, which will help the identifier answer your "what is this" question.

Clitocybe odora. Photo by Christian Schwarz
Perhaps you’ve noticed some mushrooms growing in your yard, or while you were on a hike? Maybe you were foraging for chanterelles and ended up with a few mystery mushrooms in your basket?
Whatever you’ve found, our taxonomists will be happy to help you identify them, where possible.
In the past few years, instead of bringing specimens to us in person, a growing number of people are taking cell phone photos for the purposes of mushroom identification. In general, it's more difficult for us to identify mushrooms solely from photographs. Often the taste, odor, staining reactions, tactile and/or other features and tests (as well as habitat details not visible in close-up photos) are often needed to correctly identify many species.
Here are tips on how to take photographs for mushroom ID purposes, as well as observations to include with your photos. (These observations are also helpful when you bring certain specimens to us in person!)
Photographs to Take in the Field
When you first see a mushroom in the wild, even before you dig up the mushroom (or if you're in an area that doesn't permit collection), here are a few photos and observations to capture.
Note: Your photos don't need to be beautiful. For identification, the more details we can see, the easier it will be for our taxonomists to identify distinguishing features. It may help if you support your camera on a tripod or a rock, or brace your body against something solid. Consider using a flash or a flashlight to illuminate darker areas if possible (without blowing out the image). If you'd like more tips on how to take better quality photos, check out our "Tem Tips for Taking Better Mushroom Photos" in our free FFSC Online Learning area.
Show Us the Habitat
Many mushrooms grow on or near specific trees or plants, at certain elevations, in certain temperatures, etc., or they tend to fruit at the same time as certain other plants.
Take a few photos of what the mushroom is growing on, and the immediate area surrounding the mushroom(s), such as:
The leaves, twigs, grass or dirt immediately surrounding it, or the log or tree (or leaf or bug) it's growing on
Nearby trees (including burned or charred trees)
One or two photos of the broader habitat, such as trees and plants in the general area


Examples of immediately surrounding and broader habitat
Try to photograph multiple examples of the same mushroom species that are nearby (or look-alikes if you're not sure). Show different age groups (some old-looking ones, some young-looking ones, etc.)


Show us nearby mushrooms that seem similar, of different sizes
If you're in the area for a few days, another option is to photograph the same mushroom(s) over time to show how it ages.


Examples of the same mushrooms photographed over time
Show Us Different Angles
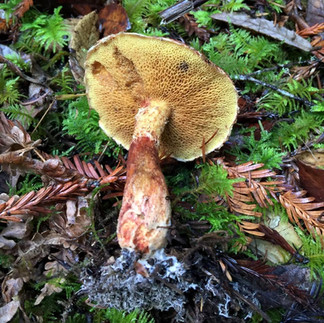
If you can't collect the mushroom, take close-up photos of it, and then move your camera to get shots of different sides of the mushroom. Set your camera on the ground to get low angles too. This helps our taxonomists examine the underside of the cap and the features of the stem.


Low angles help the taxonomists see cap and stem features
Show Us the Entire Mushroom
If the area permits collection, dig up a specimen of the mushroom so that you can take photos of the entire mushroom.
Take close-up photos (as clear/sharp as you can) showing:
The whole top of the mushroom cap
The bottom (underside) of the cap.
Features of the stem, including the very bottom of the stem.
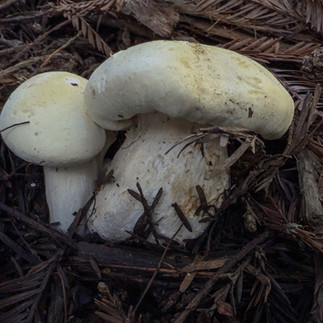
Scratch or cut through the cap, to see if there are any color changes, and photograph what you see.


Show Us the Mushroom's Size
To help the identifier understand the size or dimensions of the mushroom, you can include another object, such as nearby pine needles, your shoe (keep it on), hand or fingers, or anything (or anyone) else with a recognizable size near the mushroom. (This can be done in the field or after collecting the specimen.)


Photos that convey the relative size of a mushroom
Observations to Include with Your Photos
Many county and government-managed parks and forests do not permit mushroom collection, or you'll need to buy a collecting permit. Be sure to check the location's policies before digging up any mushrooms.
Take Detailed Notes
If you're not able to collect a specimen (or it won't survive until you're able to bring it in), write down (or photograph) the following details while in the field, and include them when you send in your mushroom photos:
The habitat where your mushroom is growing. Is the mushroom on wood or the ground? If on wood, what kind?
What tree species is it growing on (or what’s nearby)? (Nowadays many naturalist apps, websites, and even your phone's AI can help you identify trees based on their leaves.)
Write down any distinctive aroma you notice while the mushroom is fresh – “mushroomy” is NOT a good descriptor!
Create a spore print if time permits. It's easy! The sooner you can start the process, the better. See Part III of our free Learn about Wild Mushroom Identification tutorial for how to create a spore print, or search the Internet for similar tips.
Do not eat an unidentified mushroom. If a mushroom ID specialist asks you to taste a mushroom to help them ID it remotely, just take a tiny bite and then spit it out and do not swallow any of it. Some people also prefer to rinse their mouth after tasting a mushroom for ID purposes.
Bring Specimens in Person if Possible
The most reliable way for our advisors to identify a mushroom is to see, touch, smell, and potentially taste it in person.
If you’re coming to an FFSC event in person, we recommend that you store your specimens in a loose, breathable container, such as paper or wax paper bags (not plastic or glassine bags). You can place them on an ID table in a wicker basket, cardboard egg crate, or on a paper plate. People often bring specimens to our Monthly Speaker events, which are free and open to the public, and to our annual Santa Cruz Fungus Fair in January.


Photos of specimens in baskets, on paper, etc.